Rust 시작하기

Getting started
A language empowering everyone to build reliable and efficient software.
www.rust-lang.org
회사에서 3일짜리 교육을 통해 Rust 언어를 학습할 기회가 생겼다.
Rust 학습을 시작하는데 필요한 환경설치부터 간단한 hello world 출력 까지 진행해 보았다.
Rust는 멀티플랫폼을 지원하기 때문에 MS윈도우, 리눅스나 MacOS 에서 학습환경을 구성가능하다.
내 학습 환경은 MS윈도우10 이다.
Rust 언어가 무엇인지 궁금하다면?
아래 링크의 글을 참고로 읽어보길 바란다.
https://www.technologyreview.kr/how-rust-went-from-a-side-project-to-the-worlds-most-loved-programming-language/
러스트는 어떻게 세계에서 가장 사랑받는 프로그래밍 언어가 되었나? - MIT Technology Review
프로그래머들은 이제 수십 년 동안 사용한 C언어와 C++ 대신 안전하고 효율적인 ‘러스트’를 사용한다.
www.technologyreview.kr
Rust 설치하기
Install Rust
A language empowering everyone to build reliable and efficient software.
www.rust-lang.org
위 경로에서 rustup-init.exe 를 다운로드 받을 수 있다.
이 파일을 실행하면 Rust의 빌드에 필요한 사전환경이 셋팅되어있는지 확인 후,
rust관련 파일들을 다운로드 받고 설치하게 된다.
만약 Visual Studio가 설치되어 있지 않고, MS VC++ Build Tools 가 설치되어있지 않다면
아래와 같은 안내를 받게된다.
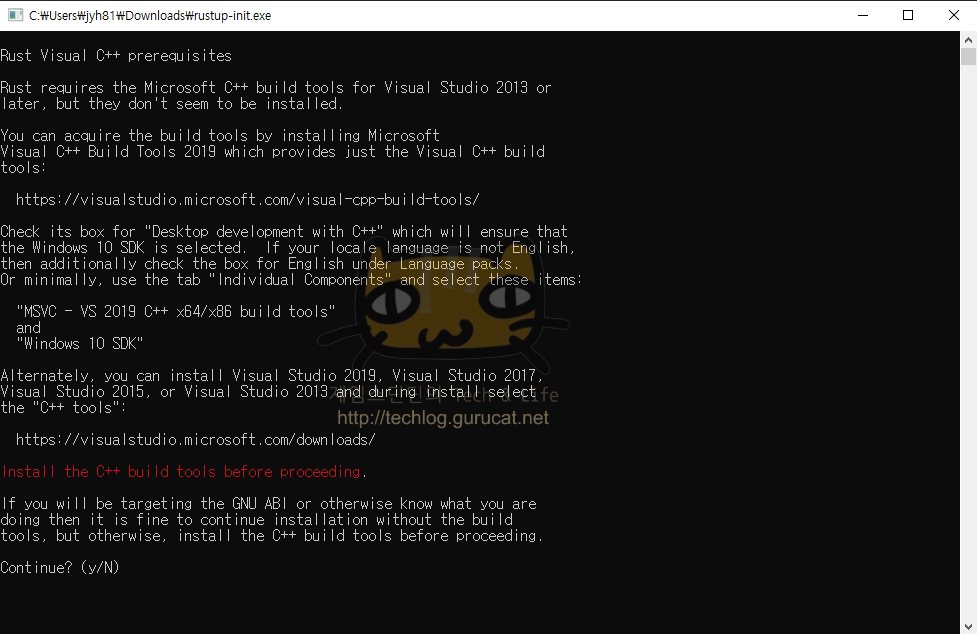
MS VC++ Build tools가 필요하다는 내용이고, 다운로드 및 설치하면 된다.
MS C++ Build Tools 설치
Rust를 시작하는데 왜 C++ 빌드 툴이 필요하지?
라고 생각할 수 있다.
Rust를 학습하는 환경이 마이크로소프트 윈도우 환경인 경우,
마이크로소프트에서 제공하는 Build Tools 를 먼저 설치 해둬야 한다.
rust언어로 작성된 코드를 실행파일로 만들때, 즉 컴파일 할 때는 'rustc' 라는 rust컴파일러를 사용하게 된다.
그런데 컴파일러 rustc는 컴파일된 파일과 MS윈도우SDK의 라이브러리와 링크과정을 거쳐야 네이티브 실행파일을 만들 수 있다. 결국 MS C++ build tool이 필요하게 된다.
https://visualstudio.microsoft.com/visual-cpp-build-tools/
위 링크에서 다운로드 받을 수 있다.
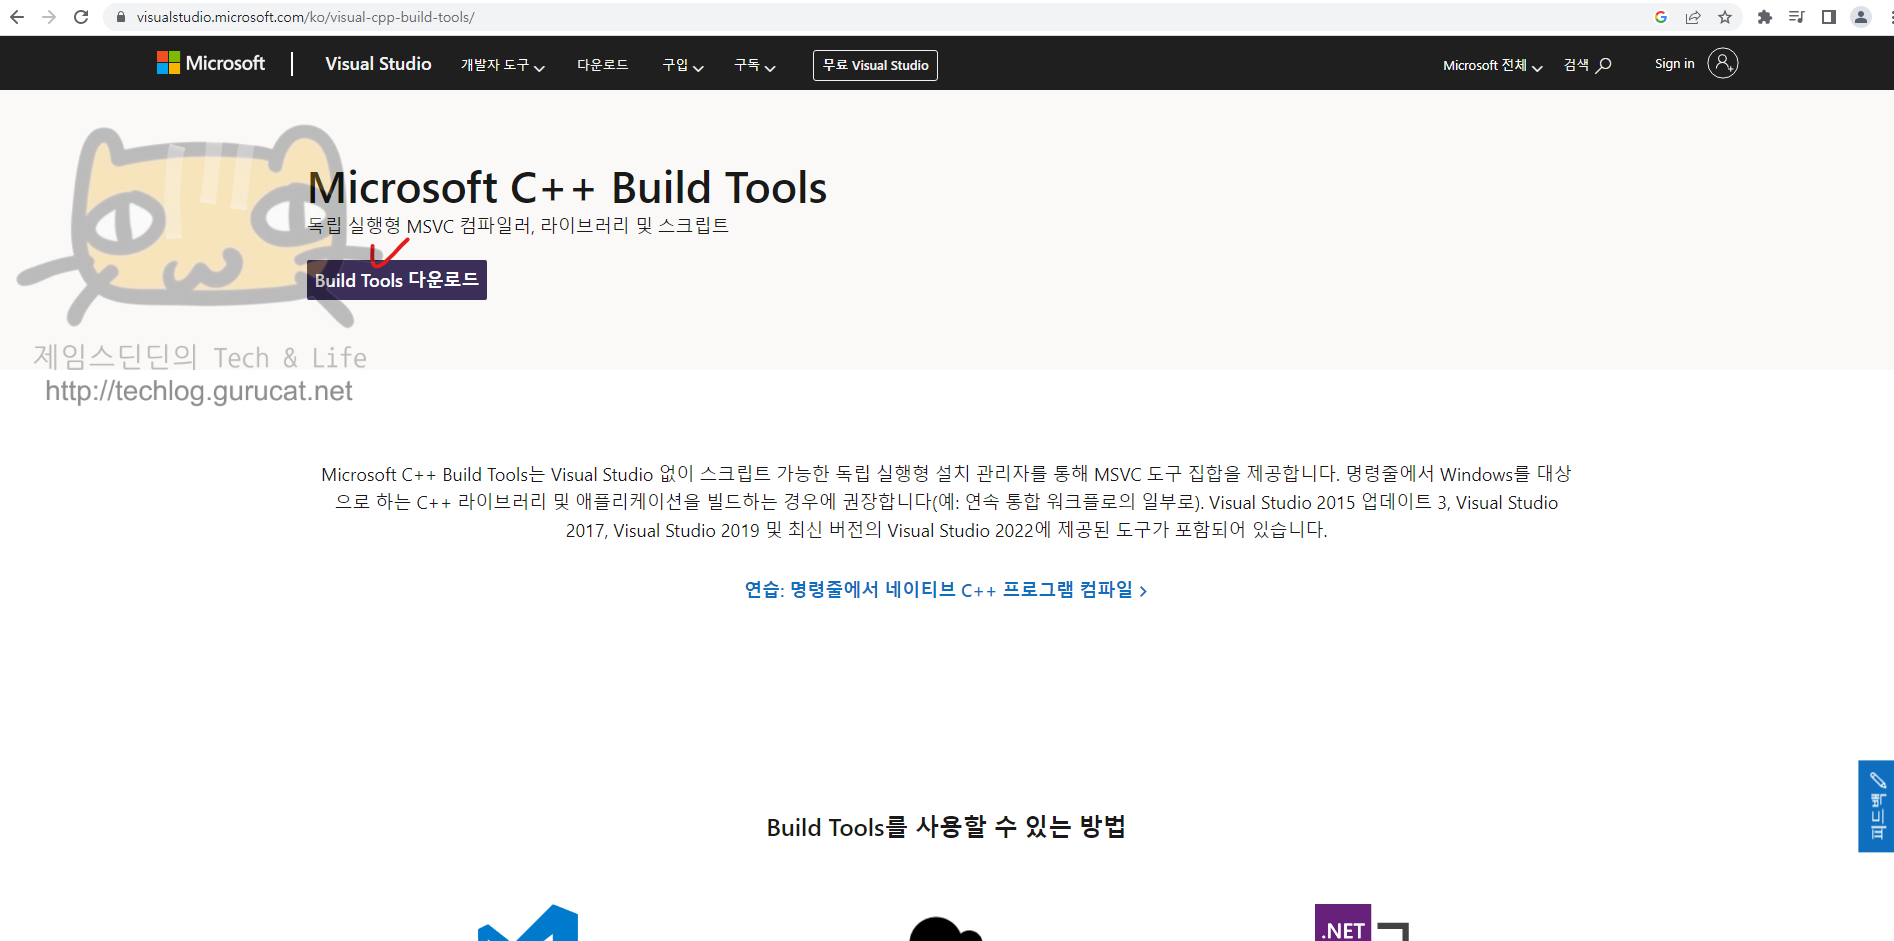
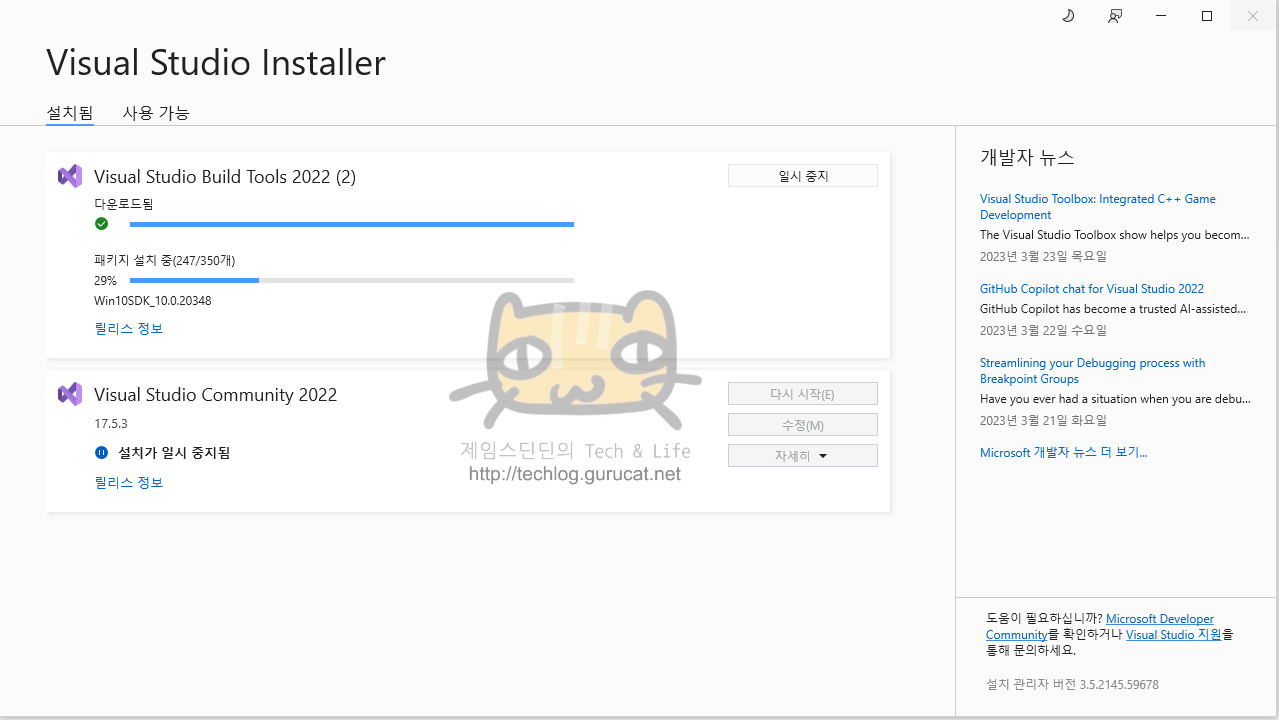
혹시라도 MS C++ Build tools 설치를 왜 해야해? 안하고 안돼? 라는 강한 의문이 든다면 설치않고 진행해보기 바란다.
아래와 같이 컴파일부터 막힌다.
MS C++ Build tools를 설치하지 않으면 ?
그러면 rust 코드를 컴파일할 때 아래와 같은 에러를 보게 될 것이다.
링커인 link.exe 를 못찾겠다는 에러다.

Rust 설치
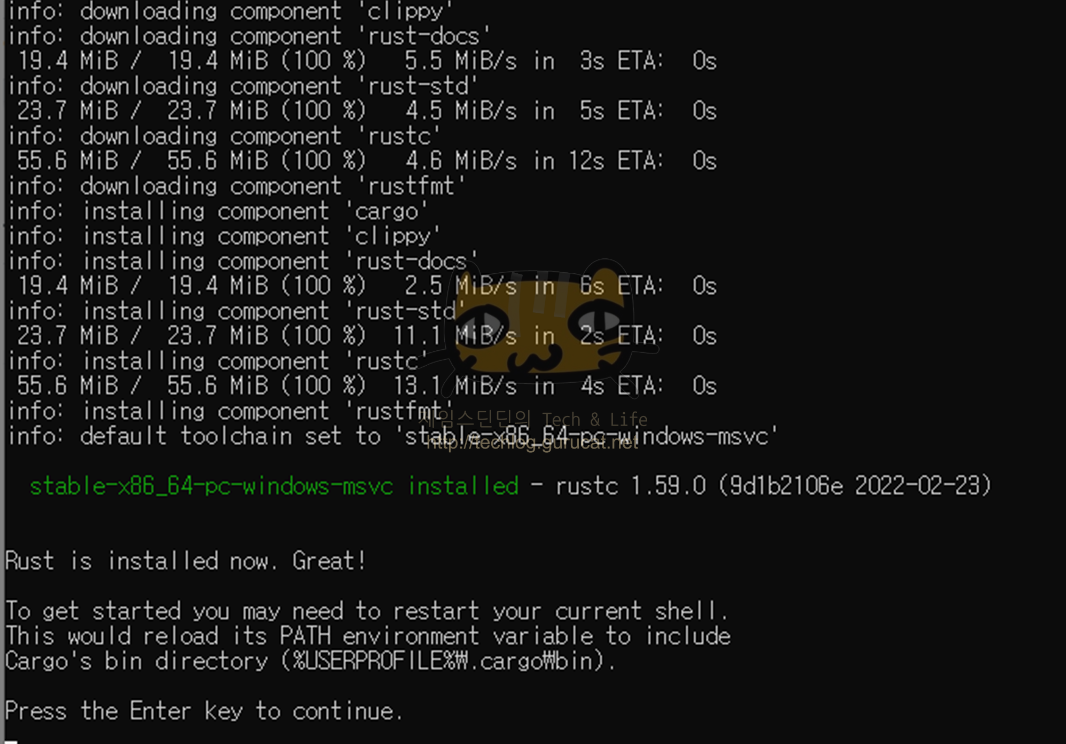
MS C++ build tools 설치가 완료된 후, 다시 rustup-init.exe를 실행해보면, rust 관련 설치를 안내하는 화면이 보여진다.
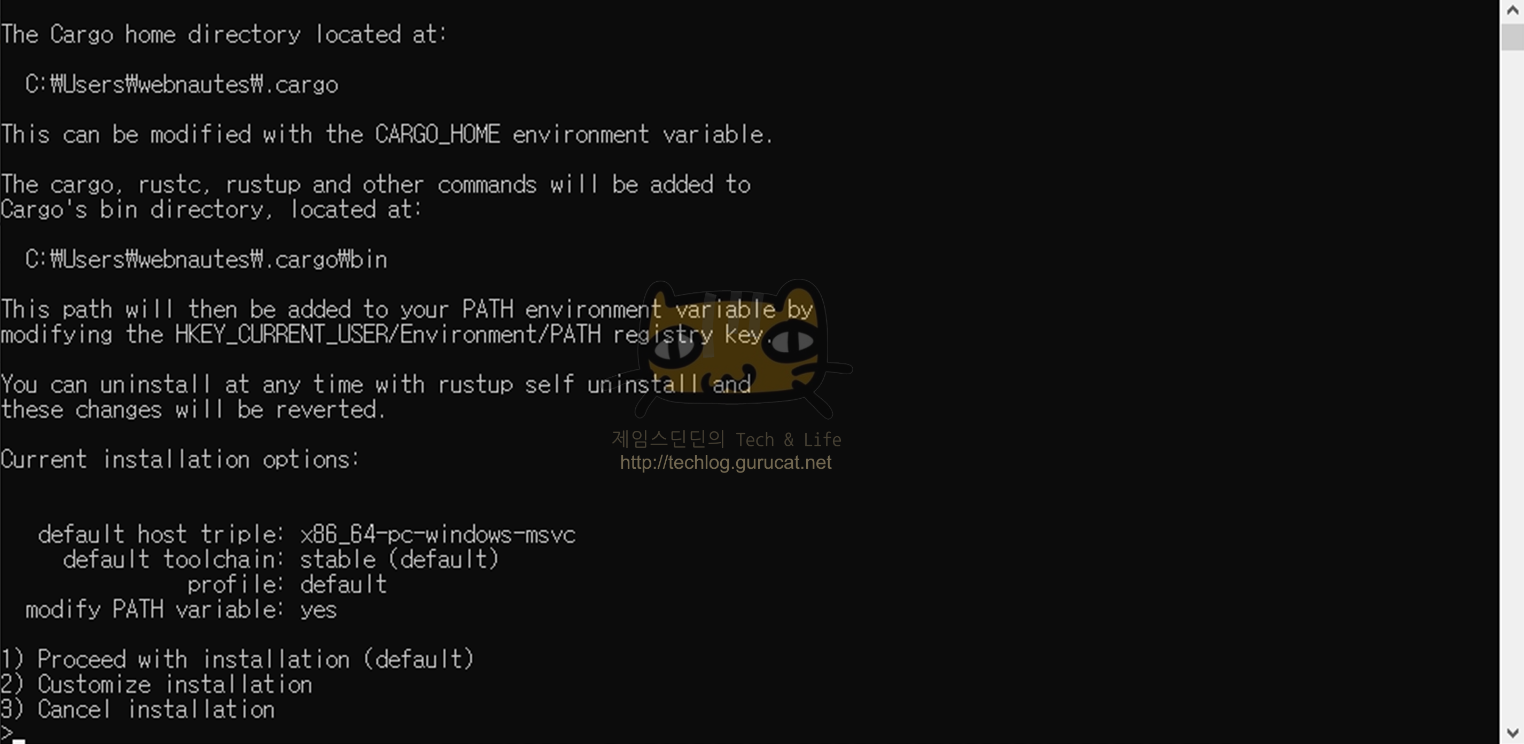
1) Proceed with installation(default) 옵션을 선택하고 설치를 진행했다.
아래와 같이 rustc, cargo 등등 관련 툴과 rust doc 등이 설치된다.
Visaul Studio Code 설치
Rust 코드작성 툴로써 VS Code를 사용할 것 이다.
내 경우는 이미 설치되어 있는 상태였다.
설치가 필요한 경우, 아래 링크에서 다운로드받을 수 있다.
Visual Studio Code - Code Editing. Redefined
Visual Studio Code is a code editor redefined and optimized for building and debugging modern web and cloud applications. Visual Studio Code is free and available on your favorite platform - Linux, macOS, and Windows.
code.visualstudio.com
VS code 확장 설치
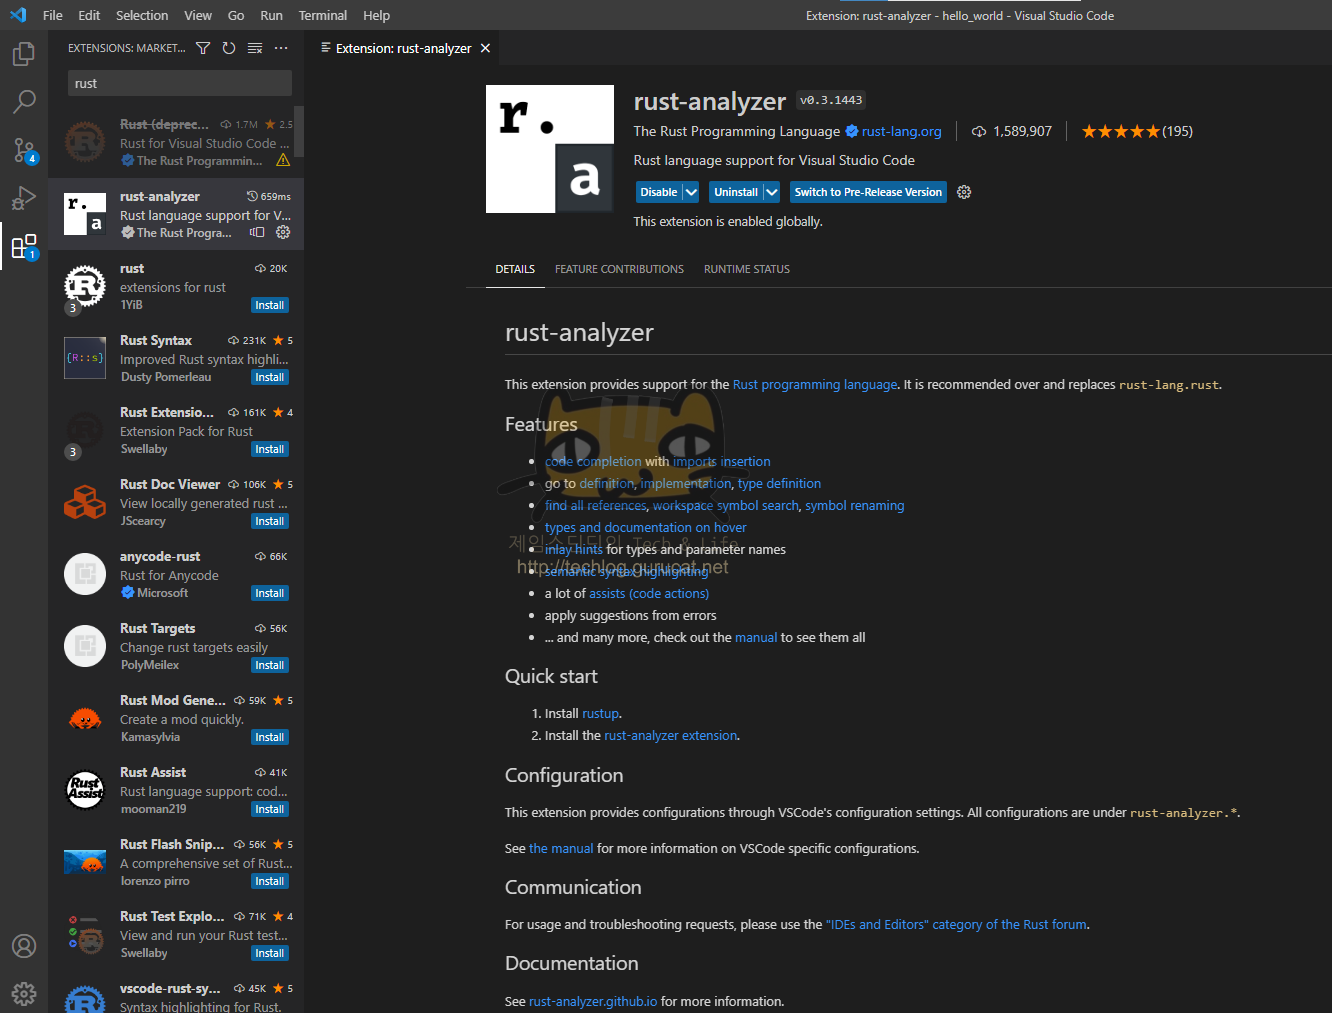
VS code에서 rust 코드 작성 시 보조도구 역할을 해줄 확장(Extensions) 하나 설치하면 좋다.
왼쪽 하단 확장 탭에서 rust로 검색하면 두번째에 올라오는 'rust-analyzer' 이다.
코드 완성, 정의/구현/타입정의로 바로가기, 참조하는 모든 코드 찾기, 워크스페이스에서 심볼 찾기, 심볼이름 일괄 변경, 마우스 올리면 타입이나 문서 보여주기, 문법 하이라이팅 등등.. rust 코드를 다루는데 있어 assistance 역할을 한다.
Rust로 Hello world 작성
폴더 하나 만들고 vs code에서 열어 준뒤 rust 소스파일 하나 만든다.
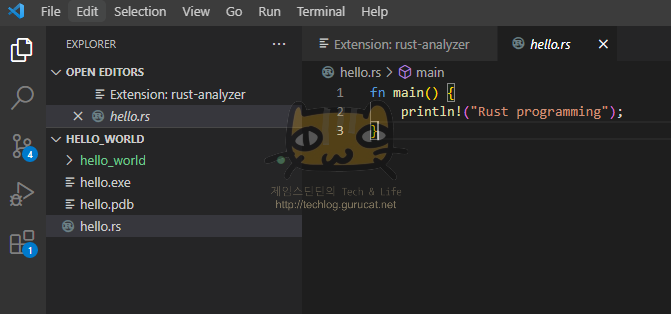
hello.rs
fn main() {
    println!("Rust programming");
}
아래와 같이 rustc로 컴파일 해보면 2개의 산출물이 생긴다.
rustc hello.rs
exe 실행파일과 pdb 파일.
exe파일을 실행해 보면 println! ( ) 매크로의 인자로 넣었던 문구가 출력됨을 확인할 수 있다.
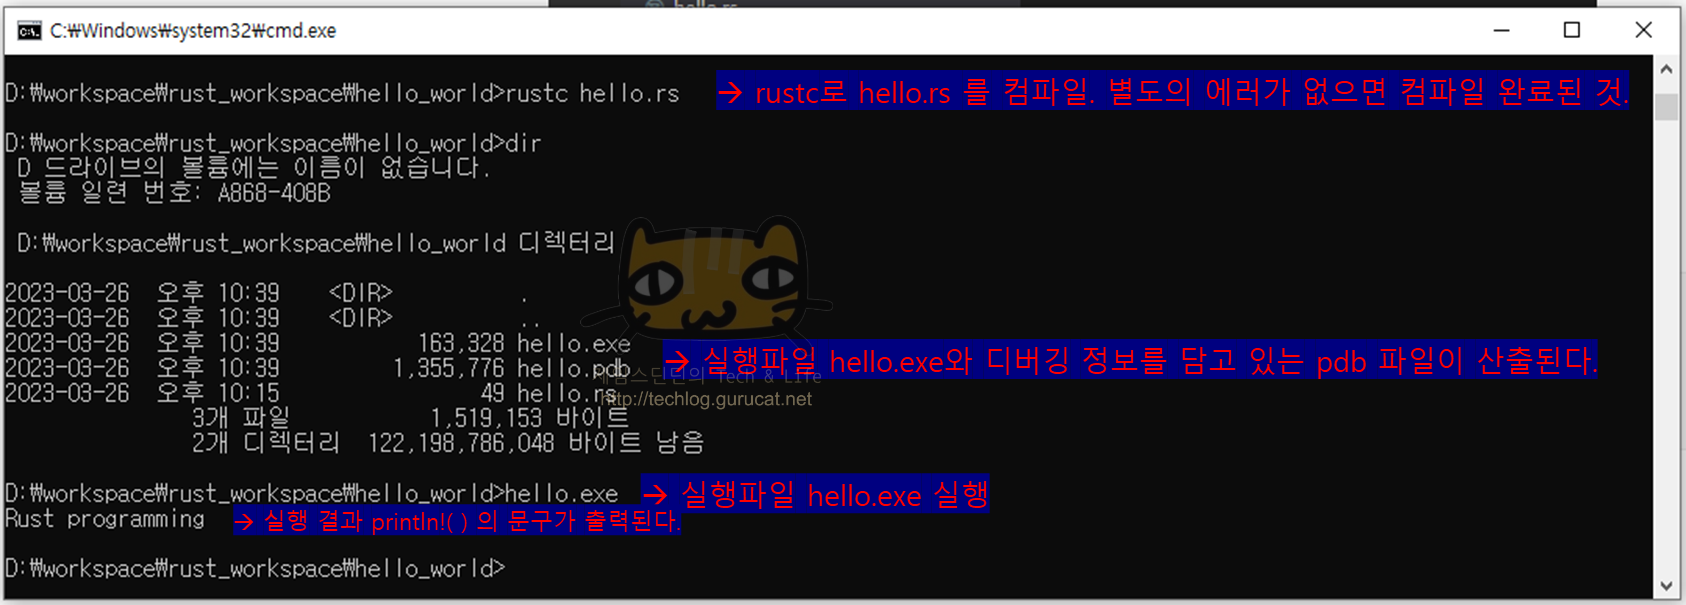
rustc를 이용해 간단히 rust 코드를 컴파일 해볼 수 있다.
rustc 에서는 아래와 같은 다양한 옵션을 지원한다.
C:\Users>rustc
Usage: rustc [OPTIONS] INPUT

Options:
    -h, --help          Display this message
        --cfg SPEC      Configure the compilation environment
    -L [KIND=]PATH      Add a directory to the library search path. The
                        optional KIND can be one of dependency, crate, native,
                        framework, or all (the default).
    -l [KIND[:MODIFIERS]=]NAME[:RENAME]
                        Link the generated crate(s) to the specified native
                        library NAME. The optional KIND can be one of
                        static, framework, or dylib (the default).
                        Optional comma separated MODIFIERS
                        (bundle|verbatim|whole-archive|as-needed)
                        may be specified each with a prefix of either '+' to
                        enable or '-' to disable.
        --crate-type [bin|lib|rlib|dylib|cdylib|staticlib|proc-macro]
                        Comma separated list of types of crates
                        for the compiler to emit
        --crate-name NAME
                        Specify the name of the crate being built
        --edition 2015|2018|2021|2024
                        Specify which edition of the compiler to use when
                        compiling code. The default is 2015 and the latest
                        stable edition is 2021.
        --emit [asm|llvm-bc|llvm-ir|obj|metadata|link|dep-info|mir]
                        Comma separated list of types of output for the
                        compiler to emit
        --print [crate-name|file-names|sysroot|target-libdir|cfg|calling-conventions|target-list|target-cpus|target-features|relocation-models|code-models|tls-models|target-spec-json|native-static-libs|stack-protector-strategies|link-args]
                        Compiler information to print on stdout
    -g                  Equivalent to -C debuginfo=2
    -O                  Equivalent to -C opt-level=2
    -o FILENAME         Write output to <filename>
        --out-dir DIR   Write output to compiler-chosen filename in <dir>
        --explain OPT   Provide a detailed explanation of an error message
        --test          Build a test harness
        --target TARGET Target triple for which the code is compiled
    -A, --allow LINT    Set lint allowed
    -W, --warn LINT     Set lint warnings
        --force-warn LINT
                        Set lint force-warn
    -D, --deny LINT     Set lint denied
    -F, --forbid LINT   Set lint forbidden
        --cap-lints LEVEL
                        Set the most restrictive lint level. More restrictive
                        lints are capped at this level
    -C, --codegen OPT[=VALUE]
                        Set a codegen option
    -V, --version       Print version info and exit
    -v, --verbose       Use verbose output

Additional help:
    -C help             Print codegen options
    -W help             Print 'lint' options and default settings
    --help -v           Print the full set of options rustc accepts
그러나, 코드 규모가 커지거나, 컴파일에 필요한 라이브러리 따위의 의존성을 지정하는등 '프로젝트' 단위 관리를 쉽게 해주는 cargo 를 사용하는 것이 더 편하다.
Cargo 를 이용해 Rust 프로젝트 생성하기
설치과정을 거쳤다면 cargo 라는 도구가 설치 되어있을 것이다.

아래와 같은 명령어로 'hello_world' 라는 이름의 새로운 rust프로젝트를 생성할 수 있다.
cargo new hello_world

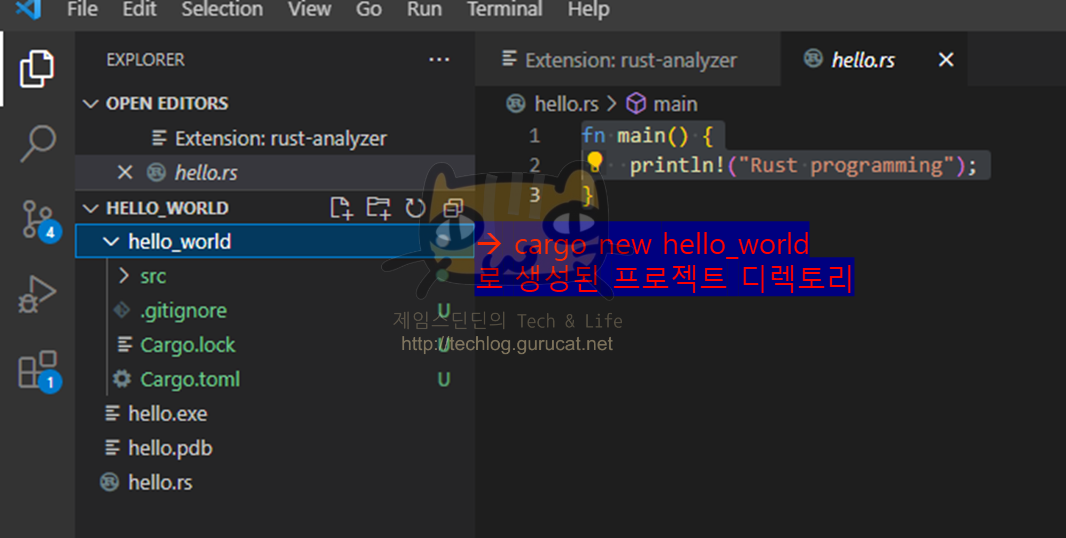
hello_world 디렉토리가 만들어졌다.
tree 명령으로 구조를 살펴보자. /F 옵션을 주어야 디렉토리 아래의 파일까지 출력이 된다.
tree /F
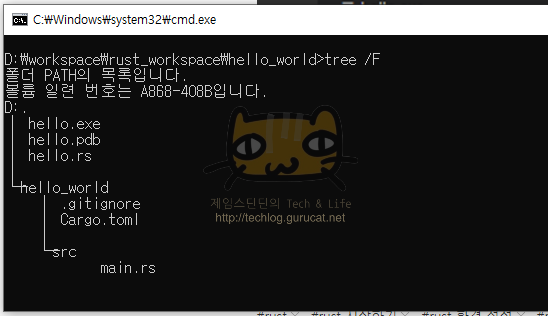
src디렉토리 아래에 main.rs 라는 소스코드까지 자동으로 만들어 주는 것을 확인 할 수 있다.
이를 vs code에서 확인해보면 아래와 같이 프로젝트 이름으로 입력했던 hello_world 디렉토리 아래에, src 디렉토리와 .gitigonore파일 Cargo.toml 파일이 생성 됐음을 확인가능하다.
이제 프로젝트를 빌드해보자.
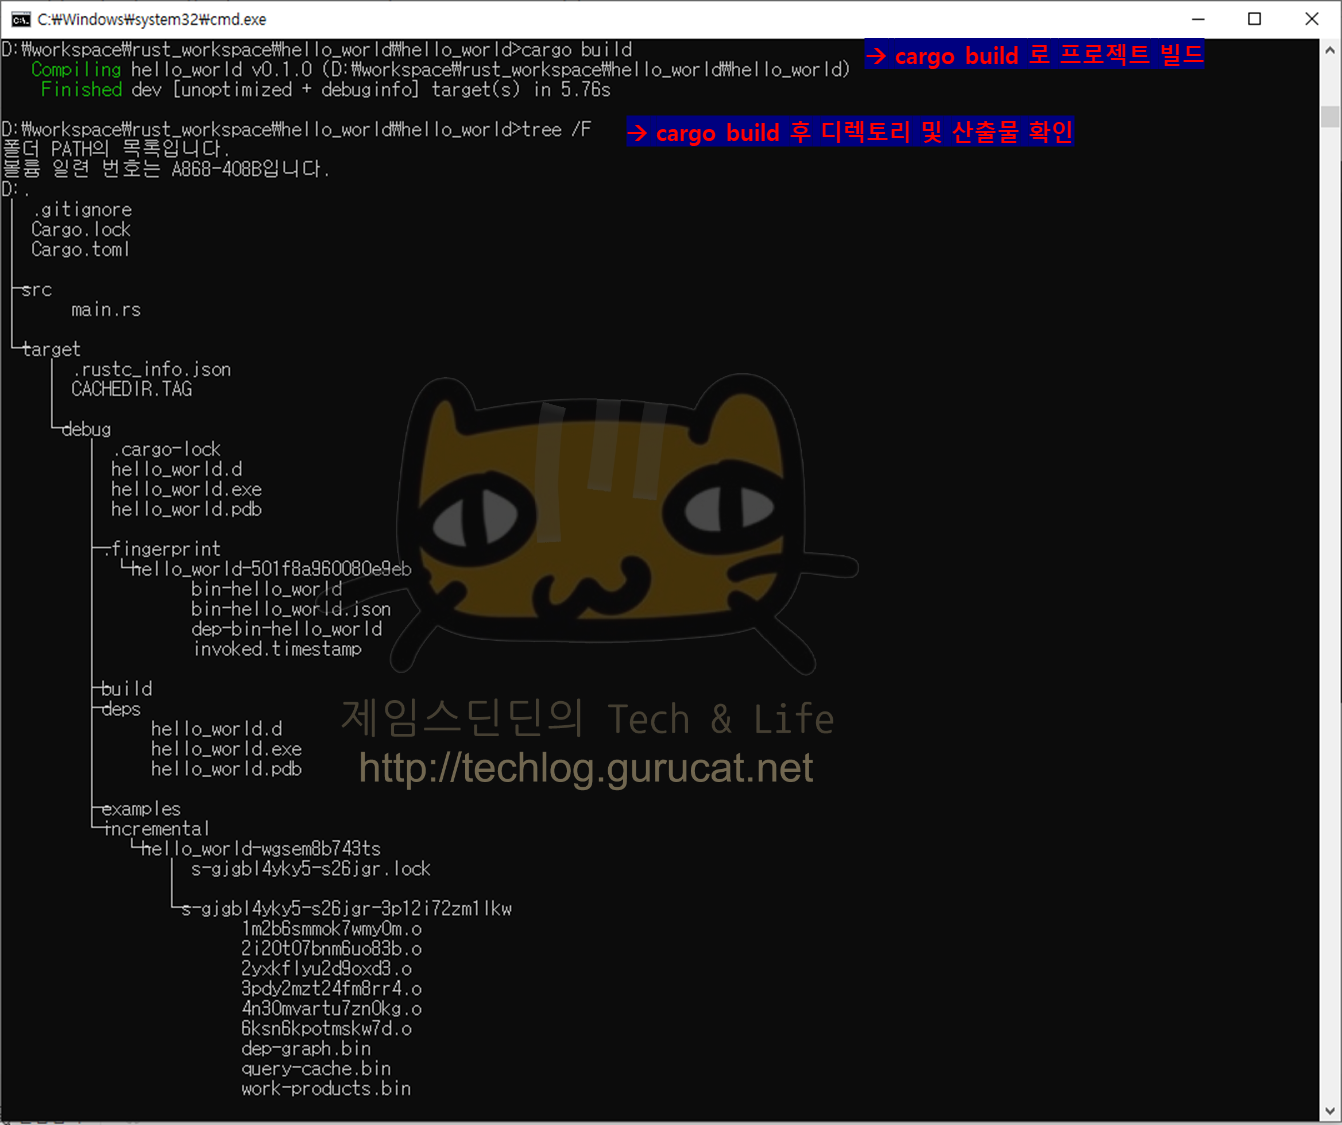
cargo build
빌드 후 산출물을 살펴보기 위해 다시 tree 명령을 활용해보면 아래와 같다.
target이라는 디렉토리가 새로 생겼으며, 그 아래로 debug/deps/hello_world.exe 파일이 생겼다.
프로젝트 빌드 후 산출물을 실행해보자.
cargo run

자동 생성됐던 main.rs 의 코드가 빌드되어 hello_world.exe가 됐고,
이 실행파일을 실행한 결과까지 확인해보았다.
그래서 Cargo가 뭔데?
Rust Package Manager이다.
D:\workspace\rust_workspace\hello_world\hello_world>cargo --help
Rust's package manager

Usage: cargo [+toolchain] [OPTIONS] [COMMAND]

Options:
  -V, --version             Print version info and exit
      --list                List installed commands
      --explain <CODE>      Run `rustc --explain CODE`
  -v, --verbose...          Use verbose output (-vv very verbose/build.rs output)
  -q, --quiet               Do not print cargo log messages
      --color <WHEN>        Coloring: auto, always, never
      --frozen              Require Cargo.lock and cache are up to date
      --locked              Require Cargo.lock is up to date
      --offline             Run without accessing the network
      --config <KEY=VALUE>  Override a configuration value
  -Z <FLAG>                 Unstable (nightly-only) flags to Cargo, see 'cargo -Z help' for details
  -h, --help                Print help

Some common cargo commands are (see all commands with --list):
    build, b    Compile the current package
    check, c    Analyze the current package and report errors, but don't build object files
    clean       Remove the target directory
    doc, d      Build this package's and its dependencies' documentation
    new         Create a new cargo package
    init        Create a new cargo package in an existing directory
    add         Add dependencies to a manifest file
    remove      Remove dependencies from a manifest file
    run, r      Run a binary or example of the local package
    test, t     Run the tests
    bench       Run the benchmarks
    update      Update dependencies listed in Cargo.lock
    search      Search registry for crates
    publish     Package and upload this package to the registry
    install     Install a Rust binary. Default location is $HOME/.cargo/bin
    uninstall   Uninstall a Rust binary

See 'cargo help <command>' for more information on a specific command.
check와 clean 까지 확인해보겠다.
cargo check
실제 빌드산출물을 만들지는 않지만 빌드가 잘 되는지 확인하는 용도.

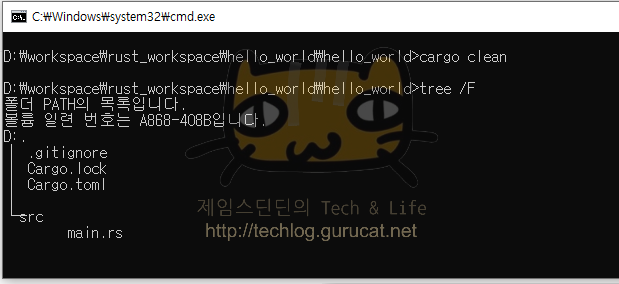
cargo clean
cargo빌드 산출물을 모두 지운다.
마치며
이상 빠르게 rust 학습을 시작하기 위해 간단히 rustc를 이용해 컴파일하는 과정, cargo를 이용해 rust프로젝트를 생성하고 빌드하는 과정을 따라가보았다.
다음부터는 rust의 특징을 학습하고, 문법을 학습하고, 문법 학습이 끝나면 C++ STL에서 사용했던 간단한 자료구조를 만들어 보고자 한다.
내용이 도움이 되셨다면 아래 좋아요♡ 버튼을 꾹 눌러주세요!
'개발자의 기록 노트' 카테고리의 다른 글
| USB 규격 마스터링 (0) | 2023.05.07 |
|---|---|
| [Rust] 윈도우 환경에서 컴파일 실패 : linker link.exe not found (2) | 2023.04.05 |
| [Rust] main함수에서 test function 호출하는 방법? (0) | 2023.04.05 |
| Notepad++ Plugin : NPP Export Plugin (0) | 2017.02.15 |
| [Mac OS] 맥의 OS X에서 readelf와 같은 binary utility 사용하기 (0) | 2016.04.04 |
| Torrent의 원리 (0) | 2016.02.03 |

